Animana Tips and Tricks

Whether you’re new to Animana or you’ve been using it for a while – the tips and tricks featured on this page are a treasure trove of discovery. You’re guaranteed to find something that will improve your Animana experience, whether it’s learning a best practice or simply acquiring a new keyboard shortcut.
The tips and tricks below are categorised for your convenience – select a category, browse them all, or use your browser’s search functionality (CTRL+F) to search for a specific keyword.
We’ll be adding to this page as often as we can, so do remember to check back for changes. If you have any questions about any of these tips, please feel free to reach out to us.
Navigating Animana with keyboard shortcuts
Did you know that you can navigate many areas of Animana by keyboard?
To get you started, here are five shortcuts that take you straight to some of Animana’s most frequently used areas. To use the shortcuts in Chrome on a Windows device, simply hold down the ALT key, and press the relevant key – and you’ll be taken straight to the appropriate area.
- Press Alt+Z to go straight to the Animana search box, and start typing, then use the ENTER key to start the search.
- Press Alt+N to open the New client screen. Once you’re there, you can use the TAB key to change fields, then the ENTER key to save the client.
- Press Alt+A to open the Agenda page at the current date and time.
- Press Alt+H to open the Animana Knowledge base in a new browser tab, where you can immediately see the Animana Status, contact details, and of course, search the extensive library of articles.
- Press Alt+S will always take you back to the Animana Start page, where you can check your tasks, and view the latest news from Animana.
- Press Ctrl+Alt+L (Windows) or Ctrl+Option+L (Mac) to log out of Animana.
Not using Chrome or Edge on Windows? No problem – substitute ALT above with the following:
- Firefox on Windows: ALT+SHIFT
- Chrome, Firefox, or Safari on Mac: CTRL + OPT (⌥) on Mac
In other tips, we’ll explore other ways to use Animana mouse-free.
Want to print these shortcuts out? – Download our shortcuts cheat sheet.
Easily identify important pet information at a glance
We realise that sometimes the patient file can be a bit overwhelming, and can become difficult to identify important information. Fortunately, thanks to Animana’s powerful ‘sticky custom protocols’, it’s easy to create a uniform way to display key patient information at the top of a patient file.
There are lots of ways to use Custom Protocols (found in General Settings> Custom Protocols), but here are two great examples, which every practice should easily be able to adapt and put into immediate use.
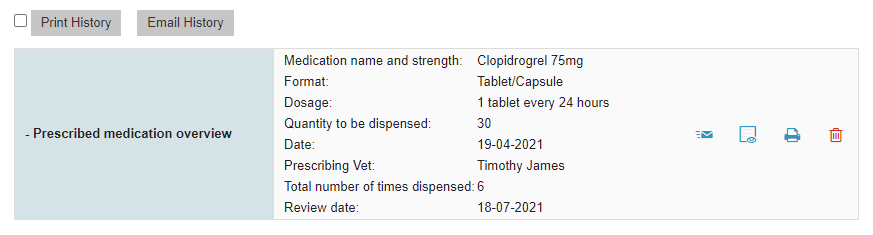
A sticky custom protocol to display medication
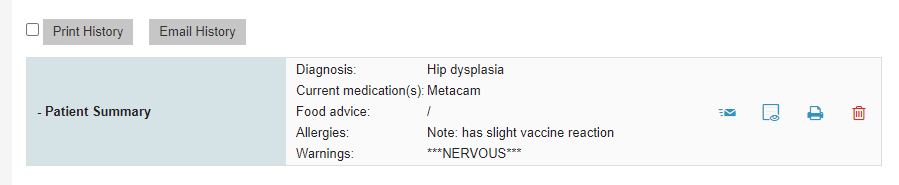
A sticky custom protocol to display key patient data
Here are a couple of tips to create this type of protocol:
-
Ensure that you tick the “Show on Top” option when creating the protocol
-
For each field, tick “Quick view” to ensure that it shows on the patient file
-
When choosing a name for the protocol, consider prefixing it with a character such as a “-” or a “!”. This will ensure the protocol is shown first in the drop-down list of protocols found in the patient file.
For more information on setup, please visit our knowledge base article here.
Using invoice alerts to increase care, optimise communication, and increase practice revenue
Did you know that Animana can create pre-and post-invoicing alerts which can prompt you to interact with customers?
Here are a couple of great examples we’ve seen used:
- Increase patient care with preventative reminders: “Please ask if the client needs flea, tick, or worm treatment for any of their pets”.

Increase patient care with preventative reminders
- Ensure the owners’ contact details are up to date: “Please check if the email address and phone numbers are correct.”

Ensure the owners’ contact details are up to date
Alerts can be created at Mailing > Content Designer > Alerts, which can then be assigned by invoice type in General Settings > Invoice Types > (Select Invoice Type) > Alerts.
For more information on set-up, please visit our knowledge base article here.
Avoid no-shows with appointment reminders
The best way to avoid missed appointments is to remind customers ahead of their appointment. There’s no magic formula as to how much before to remind, but we have found that SMS text messages are the most effective time and time again. Fortunately, you can use Animana’s automated appointment reminders to help reduce no-shows and keep pet owners informed without the manual effort of sending reminders individually.
From the General Settings > Appointment Reminder Rules you can create separate reminder rules for each appointment type that needs different messaging. For example, wellness checks might need a reminder about bringing a stool sample, while surgery appointments need fasting instructions. You only need to set up the reminder rules once and then you can sit back and you should see the difference in no-shows straight away.
For more information on setup, please visit our knowledge base article here.
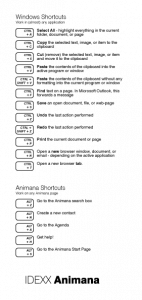
Essential keyboard shortcuts every user should know
If you’re a keyboard user, save time and frustration by learning a few of these shortcuts – they’re guaranteed to save you time!
From simple copy, cut and paste operations through to searching, printing and new browser windows and tabs, discover the shortcuts and download our cheat sheet to stick to the side of your screen to help you remember!
The following shortcuts apply to Windows computers, but the majority will also work for Apple (use the command, CMD or ⌘ key instead of CTRL) and Chromebook devices.
- CTRL+A – Select All – highlight everything in the current folder, document, or page
- CTRL+C – Copy the selected text, image, or item to the clipboard
- CTRL+X – Cut (remove) the selected text, image, or item and move it to the clipboard
- CTRL+V – Paste the contents of the clipboard into the active program or window
- CTRL+SHIFT+V – Paste the contents of the clipboard without any formatting into the current program or window
- CTRL+F – Find or search for text on a page. In Microsoft Outlook, this forwards a message
- CTRL+S – Save an open document, file, or web-page
- CTRL+Z – Undo the last action performed
- CTRL+SHIFT+Z – Redo the last action performed
- CTRL+P – Print the current document or page
- CTRL+N – Open a new browser window, document, or email – depending on the active application
- CTRL+T – Open a new browser tab.
Want to print these shortcuts out? – Download our shortcuts cheat sheet.
Restrict access to Animana by IP address
Securing your practice data is of utmost importance. For most practices, the main defence will be the username and password. However, we also advise you to enable Animana’s ability to control access by location (by network IP address). Using this feature ensures that a user can only log in to Animana from an approved network – which could be a network within your practice, or perhaps an approved home location.
Restrictions can be on a per-user basis (i.e. you can determine which users have restrictions, and which don’t), and IP addresses can be assigned to one – or all users. Only Animana administrators can change settings (in Setttings > General Settings > User Management, or see our knowledgebase article here: How do I make sure a user can only log in from a specified Network IP Address?).
Quickly see a customer’s annual spend
You can quickly see how much a customer has spent at your practice simply by hovering the mouse cursor over the lightbulb icon in the client info panel. Totals for each year are shown:

If you’d like to see more details on this breakdown at a product and service level, you can click the lightbulb icon to go directly to the reporting page of all sold products for that client. Note that only users with the “reports” permission have access to this reporting page.
Use the default client search to quickly perform powerful searches

We’re great fans of using the keyboard to quickly navigate Animana, and this is a great tip to save a few extra clicks. You probably use the header-bar search in Animana throughout your day, and you sometimes change the search from the default “client” search to “patient”, or perhaps even address, but did you know that by using some simple tricks you can also use the client search for addresses or patients (or combinations of these?).
The client search can actually search across three elements; client, address, patient. The trick is a simple comma (or two).
- The client element searches the following fields:
- First name, Last name, Email address, Visible notes, Client code, CPH
- The address element searches the following fields:
- Street, City, County, Postcode, Country
- The patient element searches the following fields:
- Patient name, Species, Breed, Descent
Each of these elements can be omitted and can be partial so, here are a few examples to show how it can work:
| Search term |
Returns
|
|---|---|
| john,, | all animals of clients who have john in a client field |
| john | all clients who have john in a client field |
| jo,CB, | all animals of clients who have jo in a client field and CB in an address field |
| j,c,f | all animals of clients who have j in a client field, a c in an address field, and an f in a patient field |
| ,john, | all animals of clients who have john in an address field |
| ,,john | all animals who have john in a patient field |
| ,,beagle | all animals of clients who have beagle in a patient field |
For this type of search to work, remember to ensure all three search fields are included (or blank) and are in the correct order of client, address, patient with both commas.
Want to print these shortcuts out? – Download our shortcuts cheat sheet.
Mastering Animana searches - What can I search for?
Chances are when you use the header-bar search in Animana, you stick to the initial “Client” or “Patient” options, but the drop-down arrow allows you to search across several types of information. Unfortunately, this depth can make it a bit of a mystery as to what you can search for, but with a bit of knowledge, it’s a powerful tool. Here’s a list of everything that the header-bar search allows you to search across:
- Client searches:
- First name, Last name, Email, Visible notes, Client code, Personal tax number (max 6 characters), CPH/UBN number
- Supplier searches:
- First name, Last name, Email, Visible notes, Client code, Personal tax number (max 6 characters)
- Veterinarian searches:
- First name, Last name, Email, Visible notes, Client code, Personal tax number (max 6 characters)
- All contacts searches:
- First name, Last name, Email, Visible notes, Client code, Personal tax number (max 6 characters)
- Client inactive searches:
- First name, Last name, Email, Visible notes, Client code, Personal tax number (max 6 characters)
- Patient searches:
- Patient name, Patient number, Species, Breed, Descent
- Patient inactive searches:
- Patient name, Patient number, Species, Breed, Descent
- Address searches:
- House number, Street, City, County, Postcode, Country
- Phone and fax searches:
- All phone and fax numbers
- Identification searches:
- All patient identification numbers
- Invoice searches:
- Internal sequence number, Invoice number, Date (DD or MM or YYYY or YYYYMMDD)
- Payment searches:
- Payment description, Document ID, Date (DD or MM or YYYY or YYYYMMDD)
- Client card searches:
- Card Type, Barcode, Card number
- Product searches:
- Product name, Sales unit, Sales price (ex VAT), Cost price, List price, Invoice text, Product Code, Package unit, Order unit, Dosage, Supplier, Supplier Code, Barcode
- Protocol
- Click this to go to the dedicated Custom Protocol search page, where you can search across all custom protocol fields, filter by protocol, by date, and inactive or active patients
- Colleague Login
- Click this to go to the Colleague Login search page, where you can filter by practice location, and search using a postcode and house number.
For more information, why not download our handy cheatsheet, which includes this information along with other useful shortcuts.
Easily email multiple invoices
Since version 6.0 of Animana, you can now send multiple invoices in a single email in just a few clicks. Select the invoices you’d like to send from the relevant client file, then click the “Email Selected Invoices” button at the top of the client file. You’ll be taken to Animana’s email screen, where the invoices you selected have been combined into a single PDF and attached as one “invoices.pdf”, so it’s handy for the recipient, too – no more multiple emails and a maze of attachments.
![]()
Easily add attachments using drag-and-drop
When adding attachments to a patient, client, or herd file, you can simply add files using drag-and-drop.
In Animana, start the process of adding an attachment to a client/patient/herd file. Use the file explorer on your computer to select the files you wish to upload, then drag and drop them over the “Choose files” (or “Browse”) button in Animana.
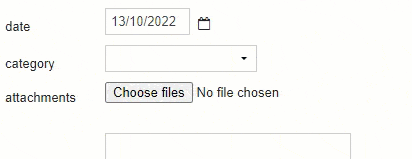 You can also drag and drop straight from other applications – for example, if you’re using Microsoft Outlook, you can drag an email straight from Outlook to the “Choose files” button – preventing the need to save to your computer first.
Use QR codes to share product information sheets with customers
You can associate a URL with a product and have a corresponding QR code automatically printed, allowing the customer a convenient way to access product information.
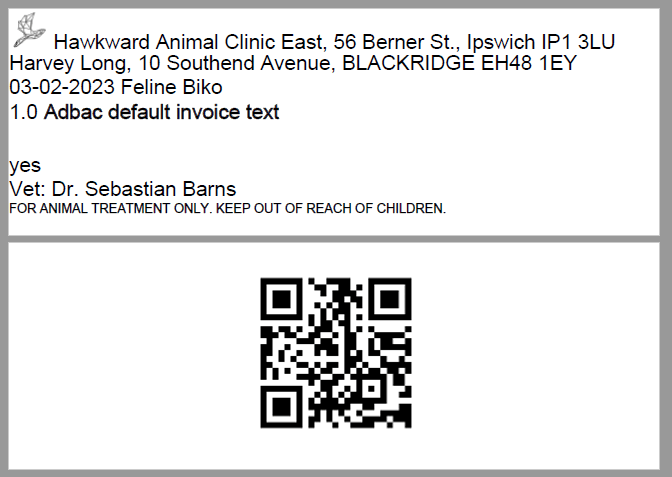
If a product has a URL, a QR code will automatically be printed as a second label.
There are two ways you can add a product information sheet URL:
- via a product’s edit screen (extra > products > products > [product] > label)
- via bulk edit products (extra > products > edit products> dropdown label)
Simplify your patient (or herd) file by customising where actions appear
Did you know that you now have full control over the order of actions, and whether they appear in the button row, or the drop-down?
To customise the actions, click the “File settings” link in the patient or herd file, or go to Settings > user settings > patient & herd file settings.
In the “Action settings” section, the left column shows actions in the drop-down, and the right column shows actions in the button row.
You can click and drag an action between the two columns, and move it up and down to change the order, as shown in the image below.

Note: your changes will be automatically saved in your account, and apply to all patient and herd files.
Get help when and where you need it
It’s frustrating when you get stuck in Animana – whether it’s functionality you don’t use very often or something that doesn’t work as you expect.
We’ve got you covered – available on over 30 screens; our ‘In page help’ buttons will display a list of resources specific to the screen you’re on, and including how-tos, interactive tours, videos, and best-practice articles. This means you can easily find answers to your queries and continue working without any delay.

Just look for the links in the top-right of the screen:
- Get help adding an attachment (Patient file > Attachment)
- Get help creating an X-ray label (Patient file > X-Ray label)
- Get help with adding this patient’s weight (Patient file > Weight)
- Get help with creating a visit form (Herd file > Visit form)
- Get help creating a task (Patient file > Task)
- Get help sending a text message (Patient file > SMS)
- Get help adding a reminder (Patient file > Reminder)
- Get help adding a product (Patient file > Product)
- Get help adding a prescription (Patient file > Prescription)
- Get help adding a note (Patient file > Note)
- Get help adding a letter (Patient file > Letter)
- Get help with creating an estimate (Patient file > Estimate)
- Get help sending an email (Patient file >Email)
- Get help adding a client order (Patient file > Client order)
- Get help with admitting a patient (Patient file > Admittance)
- Get help adding a consult (Patient file > Consult)
- Get help creating an insurance claim (Patient file > Insurance claim)
- Get help with combi-protocols (Patient file > Combi-protocol)
- Get help with SMS text messages (Settings > Content Designer > SMS > Create new SMS)
- Get help with the patient file settings (Settings > User settings > Patient & Herd File Settings)
- Get help searching for protocols (Search filter = Protocol)
- Get help with the Day overview (Extra > Financial > Day overview)
- Get help with client orders (Worklist > Client order list)
- Get help with your debtors (Extra > Financial > Debtors)
- Get help adding a transaction (Tools > Financial > Balance Cash/Bank)
- Get help with the VAT overview (Tools > Financial > VAT Overview)
- Get help closing a book year (Extra > Financial > Close book year)
- Get help with the audit log (Extra > Log)
- Get help processing this payment (Invoice > Payment)
- Get help adding a contact (New Contact)
- Get help managing your stock (Extra > Stock > Stock List)
- Get help with automated appointment reminders (Settings > General Settings > Appointment Reminder Rules)
Use health plans to provide staff discounts
Did you know that you can use Animana’s powerful health plans to provide a discount to your practice’s staff members?
Normally reserved for providing pet owners with a subscription-based discount on a selection of products and services, the Health Plan feature also allows you to create a versatile discount scheme for staff members. Moreover, you can use Animana’s reporting tools to understand who’s using—or abusing—the discount scheme.
There are a few steps to initially set this up, which we have outlined below. Once set up, the staff discount plan can be added to pets via the patient data tab.
- Create a markup (discount) in Extra > Products > Markups (for more information, see How do I create a markup for my health plan?)
- Create a price group in Extra > Products > Overview Price Groups (for more information, see How do I set up price groups for my health plan?)
- Create a staff discount Health Plan in Extra > Products > Health Plans, and link it to the price group (for more information, see How do I create a health plan?)
- Assign eligible products in Extra > Products (for more information, see How do I include products in my health plan?)
- Add the staff discount on the patient data tab of the eligible pet(s) via the Health Plan button.
The staff discount will now apply to this patient, for all products you added to the plan in step 4 above.
If you’d like a report, check out this article: How do I generate a Pet Health Plan report?. For more information, we advise you to read our Pet Health Plan Learning Path.
Discover how customers found your practice
Did you know that you can create a report to track how pet owners found your practice? Based on the data entered in the “client recruitment” drop-down when registering new customers (or via Client Data > Info), you can export this information via Extra > Export > Export Contacts. By gaining these insights, you can allocate your marketing budget more effectively, knowing what has been successful and what hasn’t!
Tip: you can make this field mandatory when registering a new client. This will ensure that this information is always captured. Please contact our Customer Support team if you want this enabled.
Learn more:
Set default sorting and actions in the patient file
If patient files feel hard to scan, or actions are not where you expect them, you can change how the patient file behaves by default.
Use File settings to control how entries within a single day are sorted (i.e. by time or by type), or you can decide whether actions are shown as buttons or in the drop-down. Moving frequently used actions into the button row reduces clicks and makes them easier to find.
You can find the File settings link at the top of the patient file, or via Settings > User settings> Patient & Herd File Settings.
